Navigating Through Your Workflow
Navigation Tools
The Reference toolbar, at the upper right side of the Workflow Designer, provides tools for easily viewing your workflow layout and locating workflow components. Under normal operations mode it looks like this:
![]()
A particularly important variation is obtained by clicking the Minimap icon ![]() :
:
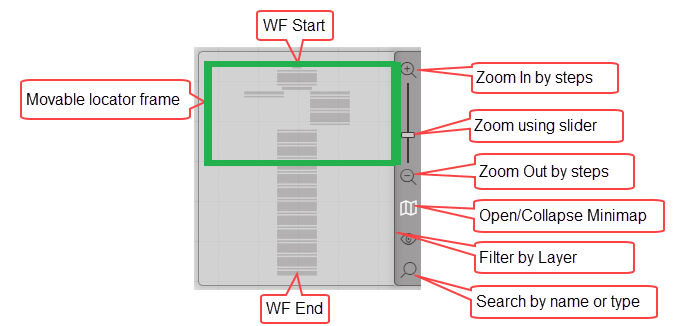
It uses a movable locator frame to focus on an extract of a full workflow:

You can grab the orange box in the Minimap with your mouse and move it around. The displayed section of the workflow will follow the Minimap. (Mouse-over to anywhere in the box, and with the left button down, continue moving the mouse.) For a workflow too large to view on a monitor screen, it provides a quick way of moving about in the workflow.
The Reference toolbar includes the following tools:
| Icon | Tool | Description |
|---|---|---|
| Zoom In/ Zoom Out | Adjusts the view by enlarging or reducing the size of workflow components on the canvas in discrete steps. For more information, refer to Adjusting the View Using Zoom. | |
| Minimap | Shows and hides a diagram of the entire workflow. The Minimap indicates which workflow components are currently displayed on the canvas, and enables you to easily navigate to a different part of the layout. | |
| Filter By Layer | Differentiates workflow components for which error handling and/or notes have been defined. For more information, refer to Filtering Workflow Components. | |
| Search Activity | Allows you to locate an activity within the workflow through a keyword search. For details, refer to Loading Activities. |
Adjusting the View Using Zoom
The zoom tool lets you adjust the view of the workflow by enlarging or reducing the size of the components on the canvas. To focus on a small section of the workflow or on a single component, increase the zoom by clicking the plus magnifying glass. To view a larger portion of the workflow, decrease the zoom by clicking the minus magnifying glass.
To increase or decrease the zoom quickly, drag the slider in the appropriate direction.
You can also control the zoom by placing the mouse pointer inside the Minimap and scrolling until the desired zoom is achieved.
Working with the Minimap
When you are building large and complex workflows, it can become a challenge to keep track of the entire sequence and understand the larger context of the individual components you are editing. The Minimap keeps you oriented and helps you quickly navigate to the sections that you need to work on.
The Minimap shows a small diagram of the entire workflow. The portion of the workflow that is currently displayed on the canvas of the Workflow Designer is surrounded by an orange frame known as the Locator Frame.
You can navigate to a different part of the workflow using either of the following techniques:
- Click inside the Minimap and drag the mouse until the Locator Frame is positioned around the components that you want to view. As you drag, the workflow on the canvas is repositioned.
- Click on the canvas of the Workflow Designer and drag the workflow until the required view is achieved. As you drag, the Locator Frame of the Minimap is repositioned to match the current canvas view.
To hide the Minimap at any time, click the map icon ![]() .
.
Filtering Workflow Components
The Filter By Layer feature lets you easily identify and locate workflow components to which the following elements have been added:
- Notes: Free text comments, generally providing additional information about the component.
- Error Handling: Instructions about actions to take if the activity or control does not behave as expected.
The following example shows a workflow that is filtered for components that contain notes. The two controls with notes are emphasized, while the other workflow components appear grayed out.
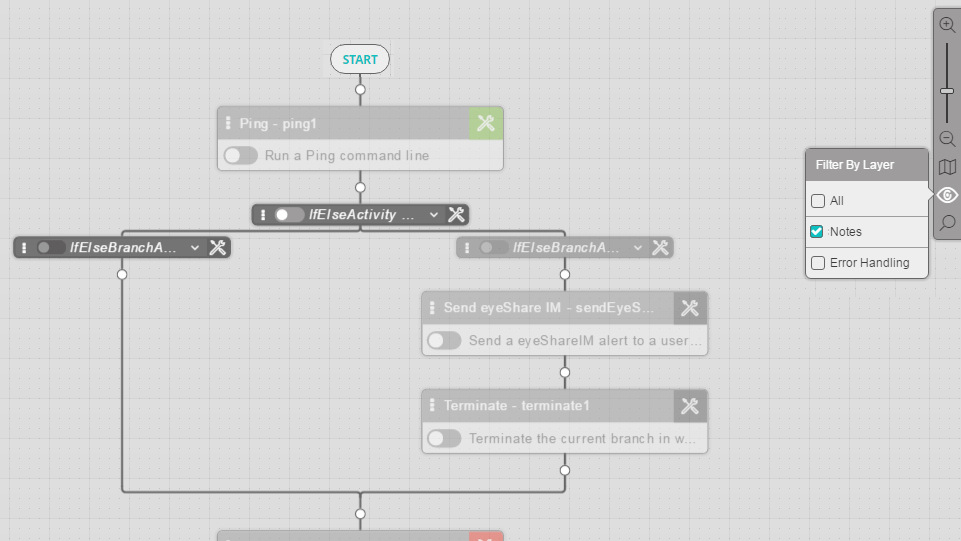
In a filtered view, components that appear grayed out are not disabled. You may update their parameters and perform any other actions on them as you normally would. In addition, they are executed when you run the workflow.
To filter your workflow:
- From the Reference toolbar, click the minimap filter icon
 .
.
The Filter By Layer popup opens. - Clear the All checkbox and then define the filtering settings by selecting or clearing the Notes and the Error Handling checkboxes.
The selected filtering is applied to the workflow.
Locating Activities Using the Search Tool
The Search tool of the Reference toolbar lets you locate one or more activities within a workflow by performing a keyword search. The keyword may contain all or part of an activity instance name or an activity type.

To locate activities using the Search tool:
- From the Reference toolbar, click the magnifying glass icon
 .
.
The Search Activity popup opens. - In Search by, select whether you want to search by name or by type.
- Enter your keyword in the field above the radio buttons.
- As you type, the name and type of the first component that matches the keyword is highlighted in the workflow diagram.
- If more than one component in the workflow matches the keyword, the total number of matches is listed at the bottom of the Search Activity popup. You can jump to the next or previous match by clicking the Up/Down arrow icons.
- Every matching activity will include a highlight ring in your brand colors.